Process
Unfortunately I did not take any screenshot of my work while doing it. However, because this piece of work followed that of a tutorial provided, I will be using the pictures that they have to explain my work.
Upon opening the file provided, I obtained this.
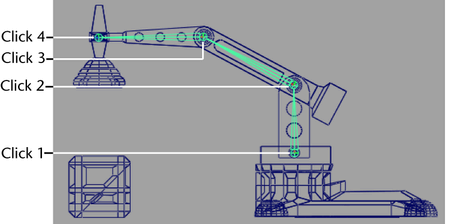
After doing so, I opened hypergraph and started to create a skeleton for my mechanical arm by using the skeleton > joint tool, following the order provided in the tutorial. I had to ensure that each click was at the center of the of the object. Click 1 to 3 were easy as the click was on a circle which had guidelines which made it easier, however, for the last click, I had to estimate the click's position.
From here on out, screenshots are taken by me. After doing so, I parented each pin according to its joint as shown below, with joint4 parenting ArmEnd.
With that, SwivelBase is made the parent of joint1 like so.
Next is applying IK where I used Skeleton > IK handle tool and selected two points on my mechanical arm, the first at the base.
And the second at the tip of the mechanical arm.
After doing that, I created a locator using create > locator, positioning it slightly above the front end of the arm and renaming it ArmControl and freezing its transformation by using Modify > Freeze transformation.
I create > annotation and typed in ArmControl
Selecting annotationLocator1 and annotation1, and in side view, moved it slightly to the left of the locator object. After doing that, I selected ArmControl and ikHandle1 respectively and used constrain > point allowing me to move the head of my mechanicalArm when armControl is selected along with this step, I set the x,y and z transformation of ArmControl to zero before selecting ArmControl and join4 respectively and constrain > orient to allow me to move my mechanical arm with its magnet maintaining its downward position when ArmControl is selected.
Next, I locked attributes that should not be changed of ArmControl and SwivelBase such as translate X for ArmControl.
After doing so, I selected ikHandle1, ArmControl and SwivelBase respectively and used edit > parent making ikHandle1 and ArmControl child nodes for swivelbase node.
Next, I set limited the arms range by setting the following for ArmControl tab.
Trans Limit Y ( Min ): -13
Trans Limit Y ( Max ): 7.5
Trans Limit Z ( Min ): -13
Trans Limit Z ( Max ): 1
Moving to Perspective view and setting ArmControl's Translate Y to -1 and Translate Z to 0, I selected ArmControl and CargoBox respectively from the hypergraph and used Constrain > parent.
I then set rotate Y of SwivelBase to -100 before selecting Platform and CargoBox respectively before Constrain > parent it. I then set the weighting for the parent constraints by setting CargoBox's Platform W1 to 0, Swivelbase's rorate Y to 0 and fianlly, selecting CargoBox and Constrain > Set Rest Position while setting its ArmControl W0 to 0. After doing these, I begin doing the animation.
First, I set the playback Start Time to 1 and the end time to 180.
After which, I began setting the ArmControl, SwivelBase, CargoBox parentConstraint according to the table provided in the tutorial to achieve the mechanic arm movement shown above. Paired with an additional moving of the box much like a cargo belt carrying the box to the arm, the final animation above is born.
These are some of the key positions of the entire animation such as the box being picked up and placed down.
Reflection
This piece of work requires a large amount of concentration as I feel that each step has to be taken with utmost precaution as one mistake could result in needing to redo the entire work. Such things are that of ensuring that each node is parenting the correct node along with the order of selecting this.
This assignment gives me a better grasp of what animation can do as well as the complexity involved. Although I am sure that there are much more things that are available, this was a great start off point.
A problem I faced while doing this was that of the constraints. At on point after I moved the box to give it that "Cargo-belt" effect, the box did not follow the magnet like it did when the "cargo-belt effect" was not added which was extremely bothersome.
However, after listening to my teacher, I was able to solve this by changing CargoBox's Blend Parent 1, Arm Control W0 and Platform W1 accordingly, an example is that of when the box is suppose to be picked up at frame 60, at frame 59, these three attributes are set to 0 and at frame 60, Blend Parent 1 and Arm Control W0 is set to 1 while Platform W1 remains as 0.
Question 4
1) Apart from their different sizes, it is obvious from Luxo Jr. that the big lamp is “older” and that the small lamp is “younger”.
How is this communicated by the animation? Give at least THREE examples.
Do NOT say because the small lamp is playing with a ball, or that its name is Luxo Jr. – you should be looking at the animation, how the lamps move and emote (emote means to express emotions).
One example is that of the chirpy and cheerful impression I felt when looking at Luxo Jr. move. From the way he walked, or rather, hopped, I felt like he was a child as he seemed to be hopping around very at a fast speed making him seem agile, unlike the big lamp where I felt that the big lamp was moving quite slowly which gave off the impression that the big lamp was older as usually, elderly would not be as agile as kids.
Another example is that of at one point when Luxo Jr burst the ball. The big lamp seemed to be comforting Luxo Jr where he nodded towards him. This gave me the impression that the big lamp wad older as usually, it would be the older one who comforts kids when they are depressed.
The last example is that of how the animator made Luxo Jr. react to the ball, where his motions made him seem to react strongly to what happens to the ball, where here was extremely jumpy and fast when he was playing with the ball and sad, noticed from how he hopped away slowly and how he looked at the floor as if he was depressed, while the big lamp was quite neutral seeing that his actions were all very slow and not as strong.
2) Give an example from Luxo Jr of how timing is used for comic effect. Explain how the timing decisions contribute to the humour.
In my opinion, the timing was made to make Luxo Jr. seem agile due to his speed. Paired up with the chirpy and cheerful-like sound, the speed seemed to keep the audiences focused on him and because of spacing between each humorous aspect which is done by timing it, audiences can fully grasp the joke before seeing the next one which allows them to fully appreciate the humourous moment.
3) When you create a joint chain, these form a hierarchy, with the first joint at the top and the last joint at the bottom. Explain why this is necessary for the joints to work properly.
By doing this, the elements inside can be rotated as if they were a single unit on its own where a comment pivot point is created at the parent node level. This allows for separate elements to rotate as if they were one unit. This is important to ensure that an animation is natural as many times, an action does not move only one joint but rather, more than one, and these joints have to follow an arc to look natural.


No comments:
Post a Comment