Unfortunately I did not take any screenshot of my work while doing it. However, because this piece of work followed that of a tutorial provided, I will be using the pictures that they have to explain my work.
Upon opening the file provided, I obtained this.
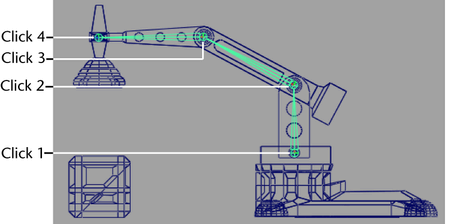
After doing so, I opened hypergraph and started to create a skeleton for my mechanical arm by using the skeleton > joint tool, following the order provided in the tutorial. I had to ensure that each click was at the center of the of the object. Click 1 to 3 were easy as the click was on a circle which had guidelines which made it easier, however, for the last click, I had to estimate the click's position.
From here on out, screenshots are taken by me. After doing so, I parented each pin according to its joint as shown below, with joint4 parenting ArmEnd.
With that, SwivelBase is made the parent of joint1 like so.
Next is applying IK where I used Skeleton > IK handle tool and selected two points on my mechanical arm, the first at the base.
And the second at the tip of the mechanical arm.
After doing that, I created a locator using create > locator, positioning it slightly above the front end of the arm and renaming it ArmControl and freezing its transformation by using Modify > Freeze transformation.
I create > annotation and typed in ArmControl
Selecting annotationLocator1 and annotation1, and in side view, moved it slightly to the left of the locator object. After doing that, I selected ArmControl and ikHandle1 respectively and used constrain > point allowing me to move the head of my mechanicalArm when armControl is selected along with this step, I set the x,y and z transformation of ArmControl to zero before selecting ArmControl and join4 respectively and constrain > orient to allow me to move my mechanical arm with its magnet maintaining its downward position when ArmControl is selected.
Next, I locked attributes that should not be changed of ArmControl and SwivelBase such as translate X for ArmControl.
After doing so, I selected ikHandle1, ArmControl and SwivelBase respectively and used edit > parent making ikHandle1 and ArmControl child nodes for swivelbase node.
Next, I set limited the arms range by setting the following for ArmControl tab.
Trans Limit Y ( Min ): -13
Trans Limit Y ( Max ): 7.5
Trans Limit Z ( Min ): -13
Trans Limit Z ( Max ): 1
Moving to Perspective view and setting ArmControl's Translate Y to -1 and Translate Z to 0, I selected ArmControl and CargoBox respectively from the hypergraph and used Constrain > parent.
I then set rotate Y of SwivelBase to -100 before selecting Platform and CargoBox respectively before Constrain > parent it. I then set the weighting for the parent constraints by setting CargoBox's Platform W1 to 0, Swivelbase's rorate Y to 0 and fianlly, selecting CargoBox and Constrain > Set Rest Position while setting its ArmControl W0 to 0. After doing these, I begin doing the animation.
First, I set the playback Start Time to 1 and the end time to 180.
After which, I began setting the ArmControl, SwivelBase, CargoBox parentConstraint according to the table provided in the tutorial to achieve the mechanic arm movement shown above. Paired with an additional moving of the box much like a cargo belt carrying the box to the arm, the final animation above is born.
These are some of the key positions of the entire animation such as the box being picked up and placed down.
Reflection
This piece of work requires a large amount of concentration as I feel that each step has to be taken with utmost precaution as one mistake could result in needing to redo the entire work. Such things are that of ensuring that each node is parenting the correct node along with the order of selecting this.
This assignment gives me a better grasp of what animation can do as well as the complexity involved. Although I am sure that there are much more things that are available, this was a great start off point.
A problem I faced while doing this was that of the constraints. At on point after I moved the box to give it that "Cargo-belt" effect, the box did not follow the magnet like it did when the "cargo-belt effect" was not added which was extremely bothersome.
However, after listening to my teacher, I was able to solve this by changing CargoBox's Blend Parent 1, Arm Control W0 and Platform W1 accordingly, an example is that of when the box is suppose to be picked up at frame 60, at frame 59, these three attributes are set to 0 and at frame 60, Blend Parent 1 and Arm Control W0 is set to 1 while Platform W1 remains as 0.
Question 4
1)Apart from their different sizes, it is obvious from Luxo Jr. that the big lamp is “older” and that the small lamp is “younger”.
How is this communicated by the animation? Give at least THREE examples.
Do NOT say because the small lamp is playing with a ball, or that its name is Luxo Jr. – you should be looking at the animation, how the lamps move and emote (emote means to express emotions).
One example is that of the chirpy and cheerful impression I felt when looking at Luxo Jr. move. From the way he walked, or rather, hopped, I felt like he was a child as he seemed to be hopping around very at a fast speed making him seem agile, unlike the big lamp where I felt that the big lamp was moving quite slowly which gave off the impression that the big lamp was older as usually, elderly would not be as agile as kids.
Another example is that of at one point when Luxo Jr burst the ball. The big lamp seemed to be comforting Luxo Jr where he nodded towards him. This gave me the impression that the big lamp wad older as usually, it would be the older one who comforts kids when they are depressed.
The last example is that of how the animator made Luxo Jr. react to the ball, where his motions made him seem to react strongly to what happens to the ball, where here was extremely jumpy and fast when he was playing with the ball and sad, noticed from how he hopped away slowly and how he looked at the floor as if he was depressed, while the big lamp was quite neutral seeing that his actions were all very slow and not as strong.
2)Give an example from Luxo Jr of how timing is used for comic effect. Explain how the timing decisions contribute to the humour.
In my opinion, the timing was made to make Luxo Jr. seem agile due to his speed. Paired up with the chirpy and cheerful-like sound, the speed seemed to keep the audiences focused on him and because of spacing between each humorous aspect which is done by timing it, audiences can fully grasp the joke before seeing the next one which allows them to fully appreciate the humourous moment.
3)When you create a joint chain, these form a hierarchy, with the first joint at the top and the last joint at the bottom. Explain why this is necessary for the joints to work properly.
By doing this, the elements inside can be rotated as if they were a single unit on its own where a comment pivot point is created at the parent node level. This allows for separate elements to rotate as if they were one unit. This is important to ensure that an animation is natural as many times, an action does not move only one joint but rather, more than one, and these joints have to follow an arc to look natural.
By dragging the pictures provided, I obtained this animation. Nothing else was done to achieve this.
Part B
Process
Having played bowling, I do know that the ball practically does not have any squash and stretch effects at all, seeing that the bowling ball itself is hard. However, I did try to add a little squash effect to it so as to properly try out this exercise.
First, I drew out the key positions of the bowling ball so as to know where I have to end up at. After which, I connected them with dotted lines, ensuring that it follows an arc and finally, numbering them.
Through this chart, I used the program pencil to do my animation. A complication that I faced was that of giving the ball a squash effect. Although I knew I had to give it a little, practically none at all, and was able to visualize it in my head, actually drawing it out was difficult.
Part C
Process
I decided to animate the video of us throwing the ball up and catching it and just like part B, I drew the chart first, starting off with the two key positions which is that of the ball at its peak and when it is in the hands.
After which, I animated accordingly, drawing the ball along the chart's path.
Exercise 2
What is ease-in ease-out in reference to animation.
To me, the idea is that of easing out from one key position and easing into the next key position where you slowly move out from one position, rather than start off at a fast velocity, and slowly move in to the next key position, rather than stop abruptly. This allows for the animation to be more natural looking.
What does frames-per-second mean?
It is the amount of frames being traversed in a second, where each frame contains slight alterations of the elements inside, which is then seen as an animation when traversed quickly.
The three main positions are that of the two ends and at the peak. Being so, more circles are drawn in these areas so as to allow the ball have additional frames to ease into these key positions and ease out of these positions.
Reflection
Animation charts makes animating easier. I feel that by knowing where the key positions are, I was able to better complete all these exercises as I knew where I was suppose to end at each given point. Squash and Stretch is also a very simple to understand concept too but plays a big role in making animations much more realistic, however, I wish that I could actually prove this with good animations but my lack of arts skills just disallows me too.
Starting off, I located the key positions and began positioning them and setting key frames.
After doing that, I had to make it look more natural and by opening the graph editor and setting the editor to show only my translate X and translate Y, I obtained this.
Using the scale tool, I made the duration shorter, from the animation ending at frame 72, to ending at frame 48. After which, I broke the tangent of point at the valley at Translate Y and using the move tool, moved both tangents such that it had a sharper V.
Finally, I broke the tangent at the first point of translate Y and using the move tool, moved its "right-tangent" and the "left-tangent" of the point at the valley to give it a nice curve. I did the same to the other curve at the end. Also, I deleted the three points in between the first and last point of translate X as they were not needed.
With that, I obtained the animation shown above.
Exercise 2
Through the animation chart from week 10's lab, I set key frames at areas where my key positions had to be set, namely at frames when the ball was either at its peak or when it bounces. I used the grid as a base to check and ensure that the ball bounces in a correct direction.
Next, using the graph editor, I broke the tangents of the points at the valleys and using the move tool, moved them so that a sharp V is made.
After doing it for all of the valley's points, as well as shift it slightly so as to obtain a I achieved this.
With that, I obtained the animation shown above.
Lab 2
Exaggerated Ball
Not Exaggerated Ball
After creating a sphere and grouping it together twice, as well as modify > Center pivot the 3 selections, I parented a Nonlinear > Squash attribute, called squash1Handle to translate_ball_gp.
I then created a base using a plane polygon, giving it color by assigning it a new material.
I then begin setting key frames at key positions, namely the peaks and bounces.
And just like the other exercises, I used the graph editor to break the tangents of the points at the valleys and using the move tool, moved the tangents to give it a sharp V as well as a nice curve at the top.
Finally, by changing the rotated Z attribute of rotate_ball_gp at frame 1 to 1 and frame 100 to -1200 , the ball rotates while it moves and with that the ball bounce sequence is completed. For the squash and stretch effect, I simply changed the squash1handle's attribute called factor to suit the condition, -1 being that of when it is squashed, 0 when it is normal or at its peak and 1 when it is stretched.
For the exaggerated ball, I made the numbers have a larger difference from one another so that the effect is much more stronger and the difference between positions is very vast.
For the not exaggerated ball, I made the numbers have a smaller difference from one another so that the effect is not as strong and the difference between positions in more subtle.
With that, I completed this lab too.
Reflection
I love the graph editor. It simply makes animating so much more easier and natural looking. Simply by breaking a tangent and shifting it, I can make a ball seem more realistic in terms of its bouncing motion which is very pleasing to see. Also, what I have learnt in week 10 is brought forward. Setting of key positions allows me to know where I have to aim for.
Finally, I feel that applying the squash and stretch effect is rather difficult in terms of capturing the proper effect that skilled animators are able to do. I feel that I will need more experience and time to actually animate a decent squash and stretch effect bounce.
After getting feedback from my teacher, I realize that there are ways to improve my work for this week. One being that of the camera angle, where he told me that when looking at a squash and stretch effect, it would be better to look from the side view as it enables the viewer to actually see how the ball maneuvers through each frames; the amount of squash and stretch effect applied.
Another method of improvement would be that of the effect itself where my teacher told me that the effect was applied throughout in an up and down motion and not that of in the direction of the ball. Meaning, for my animation, the squash and stretch effect is seen as stretching up and downwards rather than that of slanted slightly in the direction of the ball. This was something which I did not know and would embed into future assignments.
Why is squash and stretch so useful in animation?
I feel that it is useful as it allows for our animations to look natural and life-like as well as allows us to leave our audiences with a stronger impact if we choose to exaggerate the action.
Think of a situation in which extreme squash and stretch could be applied to a character
Seeing that I am someone who is interested in very exaggerated animation, my choice of situation would be that when an energy bolt is being controlled by a caster into attacking his enemy whom is continuously pummeled by this one bolt. The effect is applied mainly when the bolt collides with the enemy. Other than the obvious squash being applied when colliding and stretch when moving, another area where this effect can take place is upon collision when the human's skin has a slight squash effect due to the blow, and a stretch effect upon the ball leaving.
Think of an animation example where squash and stretch would NOT be appropriate.
I feel that a squash and stretch effect would not be appropriate for animations that have no form of contact or impact in it such as flying with no wind resistance.
If squash and stretch doesn't really happen so obviously in real life, why do you think is it so effective in animation.
This allows our animation to look more lively as what we are animating are merely a combination of polygons. Also, it allows us animators to carry out certain animations which leaves a stronger impact on our audiences, making our animations much more nicer and possibly, natural or realistic.
1)Do you need to be able to draw well to create good 2D animation? Explain your view.
Yes, as I feel that one indeed needs to draw well to create a good 2D animation as I feel that although many teachers tell us that we do not need to be good in drawing to excel in designing, animation being one of these factors, being able to draw allows one to create beautiful images that will entice his audiences. Furthermore, by having this ability, mixed in with effort and understanding of animation that can be obtained even by those who do not excel in art, beautiful 2D animation can be created. Where on the other hand, people who have the same amount of effort and understand but lack the talent, will create only decent animation that gives off a natural feel but will be unable to entice its audiences due to the poor drawing that would make it not captivating.
2) Do you need to be able to draw well to create good 3D animation? Explain your view.
Although it is animation as well, my answer slightly differs from that of my first question as now, have different opinions. On one hand, I feel that one does not need to draw well to be able to create good 3D animation as primitive shapes and simple tools are present in various animating applications, like MAYA, that allows the person to easily create a proper model and animate it, given the right skill and understanding.
On the other hand, I also feel that one needs to draw well to create good 3D animation as although these tools are given to them, this lack of skill might prevent them from creating excellent models using this primitive shapes as they are unable to fully picture or create the a beautiful model of what they envisioned in their head, unlike that of someone who possesses the skill of art who can full draw out what he has envisioned and thus, also allow him to create that via MAYA.
3) What do you think would separate a piece of poor animation from a piece of good animation? In other words, how would you go about deciding if a piece of animation is good or bad?
Effort and time aside, I feel that i can determine the quality of the work based on how natural it looks and the emotions that it makes me feel, whether it moves in a certain and proper way and whether it makes me feel sad or happy when I have to.
4) In 2D animation, you need to be very aware of timing at a frame by frame level, using timing charts and other techniques - but for 3D animation, this is handled using the graph editor, which is more concerned with manipulating rates of change over time.
Does this affect how you approach your animation work? Explain.
No it does not. Bluntly, I have to say that initially, I have no experience in animation whatsoever, being so, these information that clearly shows that there is a difference in method of animation between the two however, having no experience before, I am simply learning what I have to, be in 2D animation or 3D, thus, not affecting me at all.
Judging by the terms used however, I feel that 2D animation requires more precision as compared to 3D. Being so, I feel that I would approach 2D work much more carefully while approach 3D less on the careful side but more on increasing my pace of doing the work as it seems that 3D animation requires more work.
5) Give a brief critique of Maya as an animation tool. Don't just say Maya makes animation difficult, or easy, or that you need to learn a lot of stuff to use Maya - explain what Maya does well and not so well in terms of creating animation.
To start off, Maya has a variation of shortcuts to carry out any given particular task where we, the users, have to find the right shortcut that suits us. Even the basic aspect of modeling the object is made easy through the various operations available, ranging from apply a surface that comes in a variety of different types like blinn, to simply extruding it. Add this on to the also highly sophisticated animation operations, which also has its large variations, ranging from having a mini-camera which users can move to achieve the desired camera angle, to simply creating a path for the object to move on, and one can easily create a decent animation in no time.
By squatting down, audiences will anticipate that a jump will follow up.
Squash and Stretch
Upon squatting down, a squash effect is present as I am, in a way, compressed, after which, when I jumps, a stretch effect is shown as the length of my body seems to be lengthen.
Staging
Just by looking where I am positioned, as well as the two doors, mixed in with my starting motion which creates anticipation for the audiences to know that I will be running, it is made clear to them that I would be running towards the doors.
Follow through and overlapping action
When punching someone, his entire body does not stop upon contact. When his fist comes into contact with the person, he will still continue to have a twisting motion as his waist and arm follows through with the motion. This is the follow through. For overlapping action, it is that his entire body does not follow up immediately when he winds up his punch, it follows up a few frames later.
Arcs
When punching, the punch does not randomly move up and down as it travels towards its target. It follows an arc of motion that keeps it looking natural. Meaning, when punching something, the fist will travel in that direction in a fixed direction making it look natural.
Secondary action
The punch in this video was the primary action, while the fierce and angry expression on the person's face is the secondary actions as it is not the main action but it contributes into telling viewers the current mood of the person, enriching the reason of the action. With these two actions working together, it allows the action to leave a stronger impact on the audience.
Exaggeration
In terms of animation, if i wanted to give the video give off a very strong impact, I would exaggerate his range of motion, increasing the duration of his starting pose, make it seem like the punch would be a strong one, as well as the arc of motion, extending it so that he has a stronger looking start and finish.
Solid drawing
When animating the bounce, solid drawing is needed when applying the squash and stretch effect on the ball as it bounces to ensure that it looks natural and that the volume of the ball remains constant as, for example, when a squash effect is applied, the width of the ball is extended while its height is decreased and solid drawing is needed to ensure that the ball looks the same despite the effect applied.
Timing
The ball has to travel at an increasing velocity and timing is very important when animating this action as the ball has to fall and rise at an appropriate looking speed and this speed is shown through the timing of the animation.
Straight ahead and pose to pose
To make the animation look natural, I would draw 3 main poses which is the initial starting position of the ball, when it lands and when it returns back up but at a lower height. By creating these three positions, I can animate the ball much more easily as I know which 3 areas I am suppose to aim for, and following up with straight ahead, it allows the motion to be very natural.
Appeal
The character has appeal as he portrayed a large amount of aggression and hostility making him seem evil, much like a villain.
Slow-out And Slow-in
When doing the robot, he eases out from one pose and eases to another.
Exercise 3
This exercise will be focused on the fight from 1:30 to 2:00.
Follow through and overlapping action
When the archer squats down, her cape continues to fall despite her actions coming to a stop.
Staging
At 1:48 when the archer's arrow as well as the battle is shown, the perfect stage is shown as the audience can clearly see what is going on, as well as allows them to understand the emotions, plan, attitude and idea of the situation.
Anticipation
At 1:48, viewers have a sense of anticipation as the archer draws her arrow as it allows them to anticipate that she would be firing it.
Straight ahead and pose to pose animation
At 1.52 when the archer stands up, it would seem that there were two main poses, that of when she was squatting down and when she stood up, and followed up with straight ahead where it actually showed that she moved from her initial position to her ending position rather than having a suddenly change of position if straight ahead was not used.
Exaggeration
At 1.53, when the arrow travels past two other characters, the time is slowed down to exaggerate the moment, making the moment seem more eye catching and intense due to this exaggeration.
Appeal
From the start of the video to the end, the purple character can be seen to be rushing to his hands aid giving off a strong appeal as a heroic character. At 1.53, during the slow-mo, it further improves his appeal as he is able to work well with his teammates much like a leader.
Process
First, I analyzed what each of the 12 terms meant, through the websites given as well as with the help of my teacher.
After which, I analyzed each of the videos taken as well as review many of the videos I have watched over the years, chose carefully, and embed the terms which I thought were best suited for that particular video.
Reflection
Through this exercise, I realize that there is more to animation than meets the eye. Initially, I though it was merely moving an object from one position to another. Now, I see that various principles are used in each animation to make it look natural like as if it were happening in real life.
Also, I would like to thank my teacher here as initially, I was quite unsure of what each term meant. Although there might be some errors in how I describe the terms above, I am confident in saying that I am more sure of them with my teacher's help then when I did not ask him.